部署
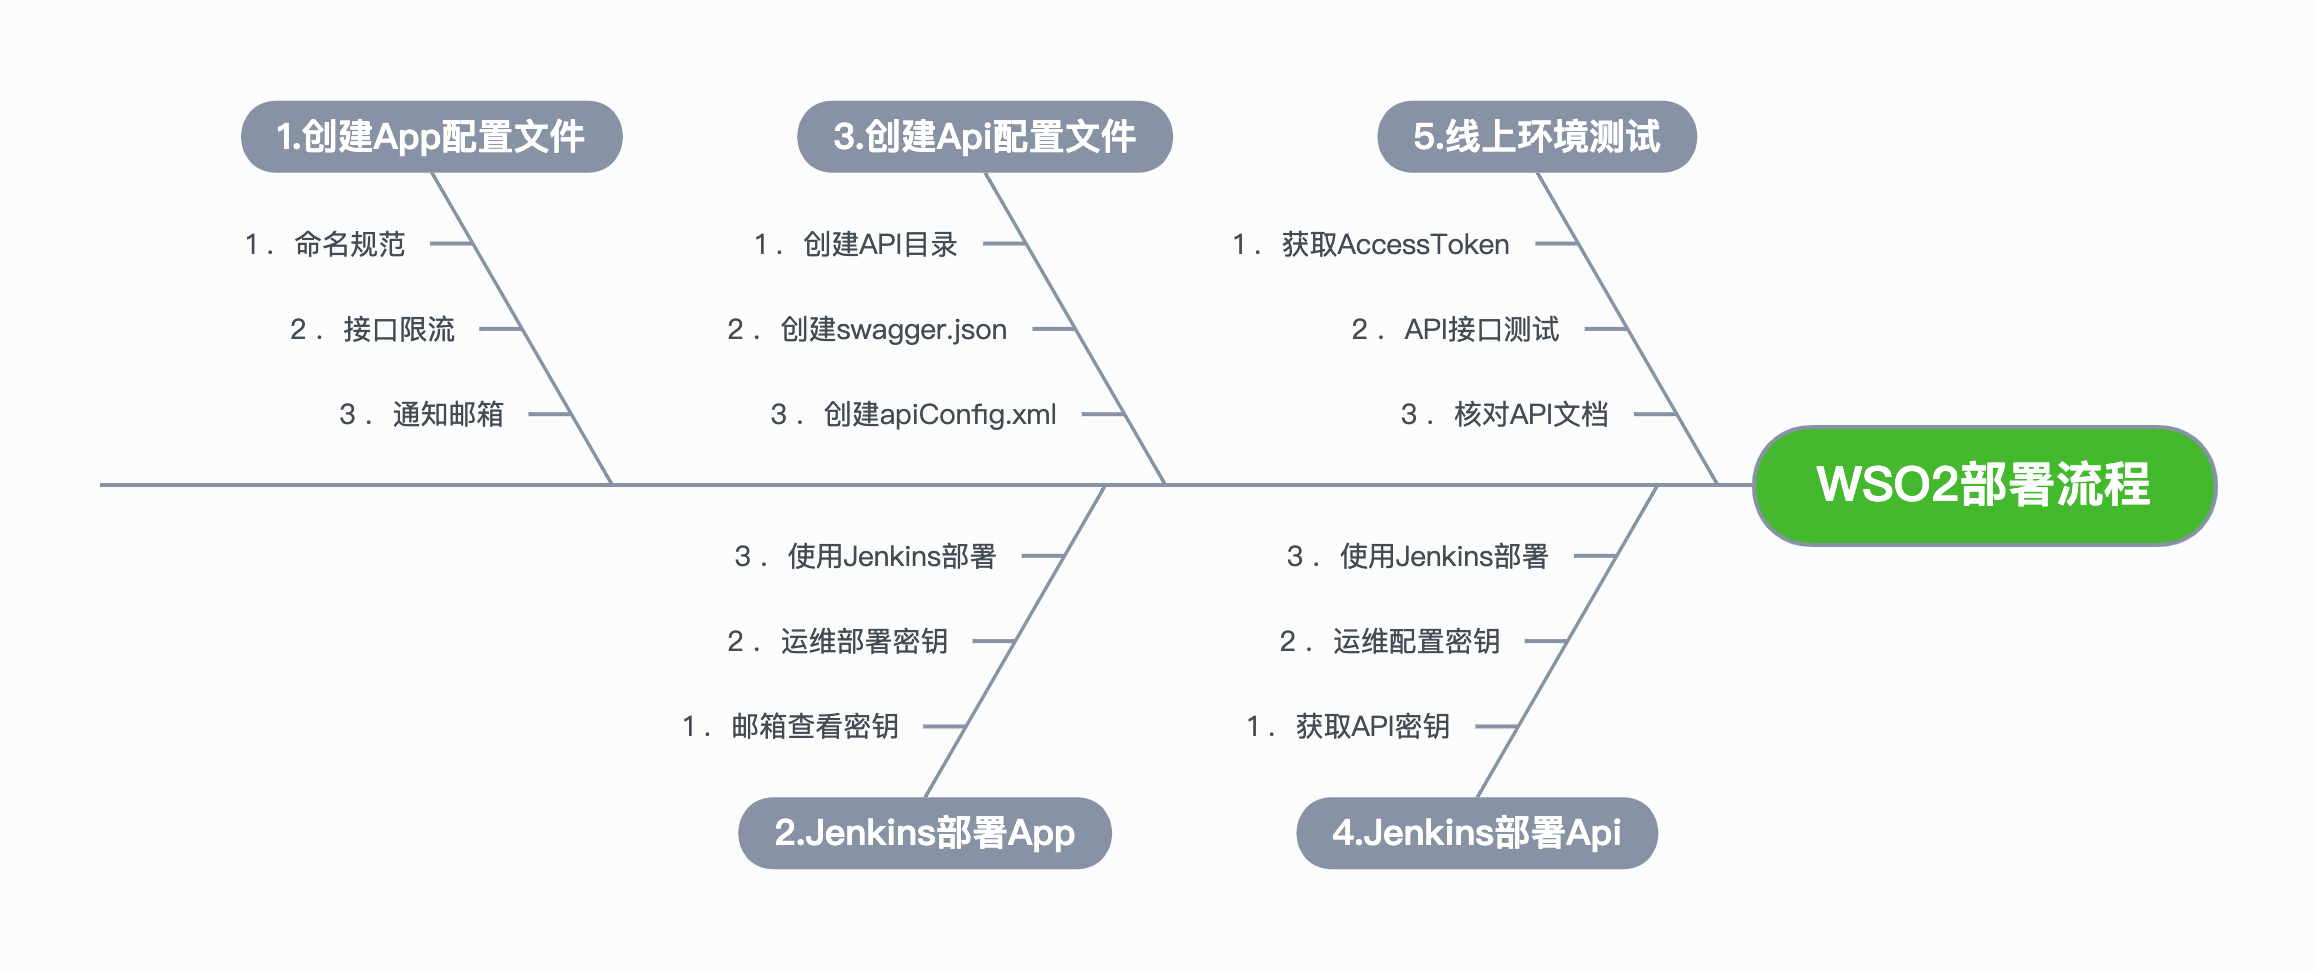
部署流程:
SVN地址:
ini
# dev环境代码(用于部署Dev/Dev2/Opt环境)
svn://10.251.68.174/view_repos/fos/GatewayDev
# dev2代码(用于部署RC和Live环境)
svn://10.251.68.174/view_repos/fos/GatewayStaging
1.创建并部署App
创建App配置文件
注意:原则上一个BU对应一个Application,如果该Application已经存在,使用现有的即可。
示例: 在 CommonAssets/ApplicationSetting/AP 目录下创建App配置文件
VIEW_AP_APPLICATION.xml
xml
<?xml version="1.0" encoding="UTF-8"?>
<applicationConfig>
<name>VIEW_AP_APPLICATION</name>
<throttlingPolicy>Unlimited</throttlingPolicy>
<description>For VIEW AP WSO2 API APPLICATION</description>
<tokenType>Client_Credentials</tokenType>
<notificationUser>samwang@rayootech.com,wadewang@rayootech.com,janms@rayootech.com</notificationUser>
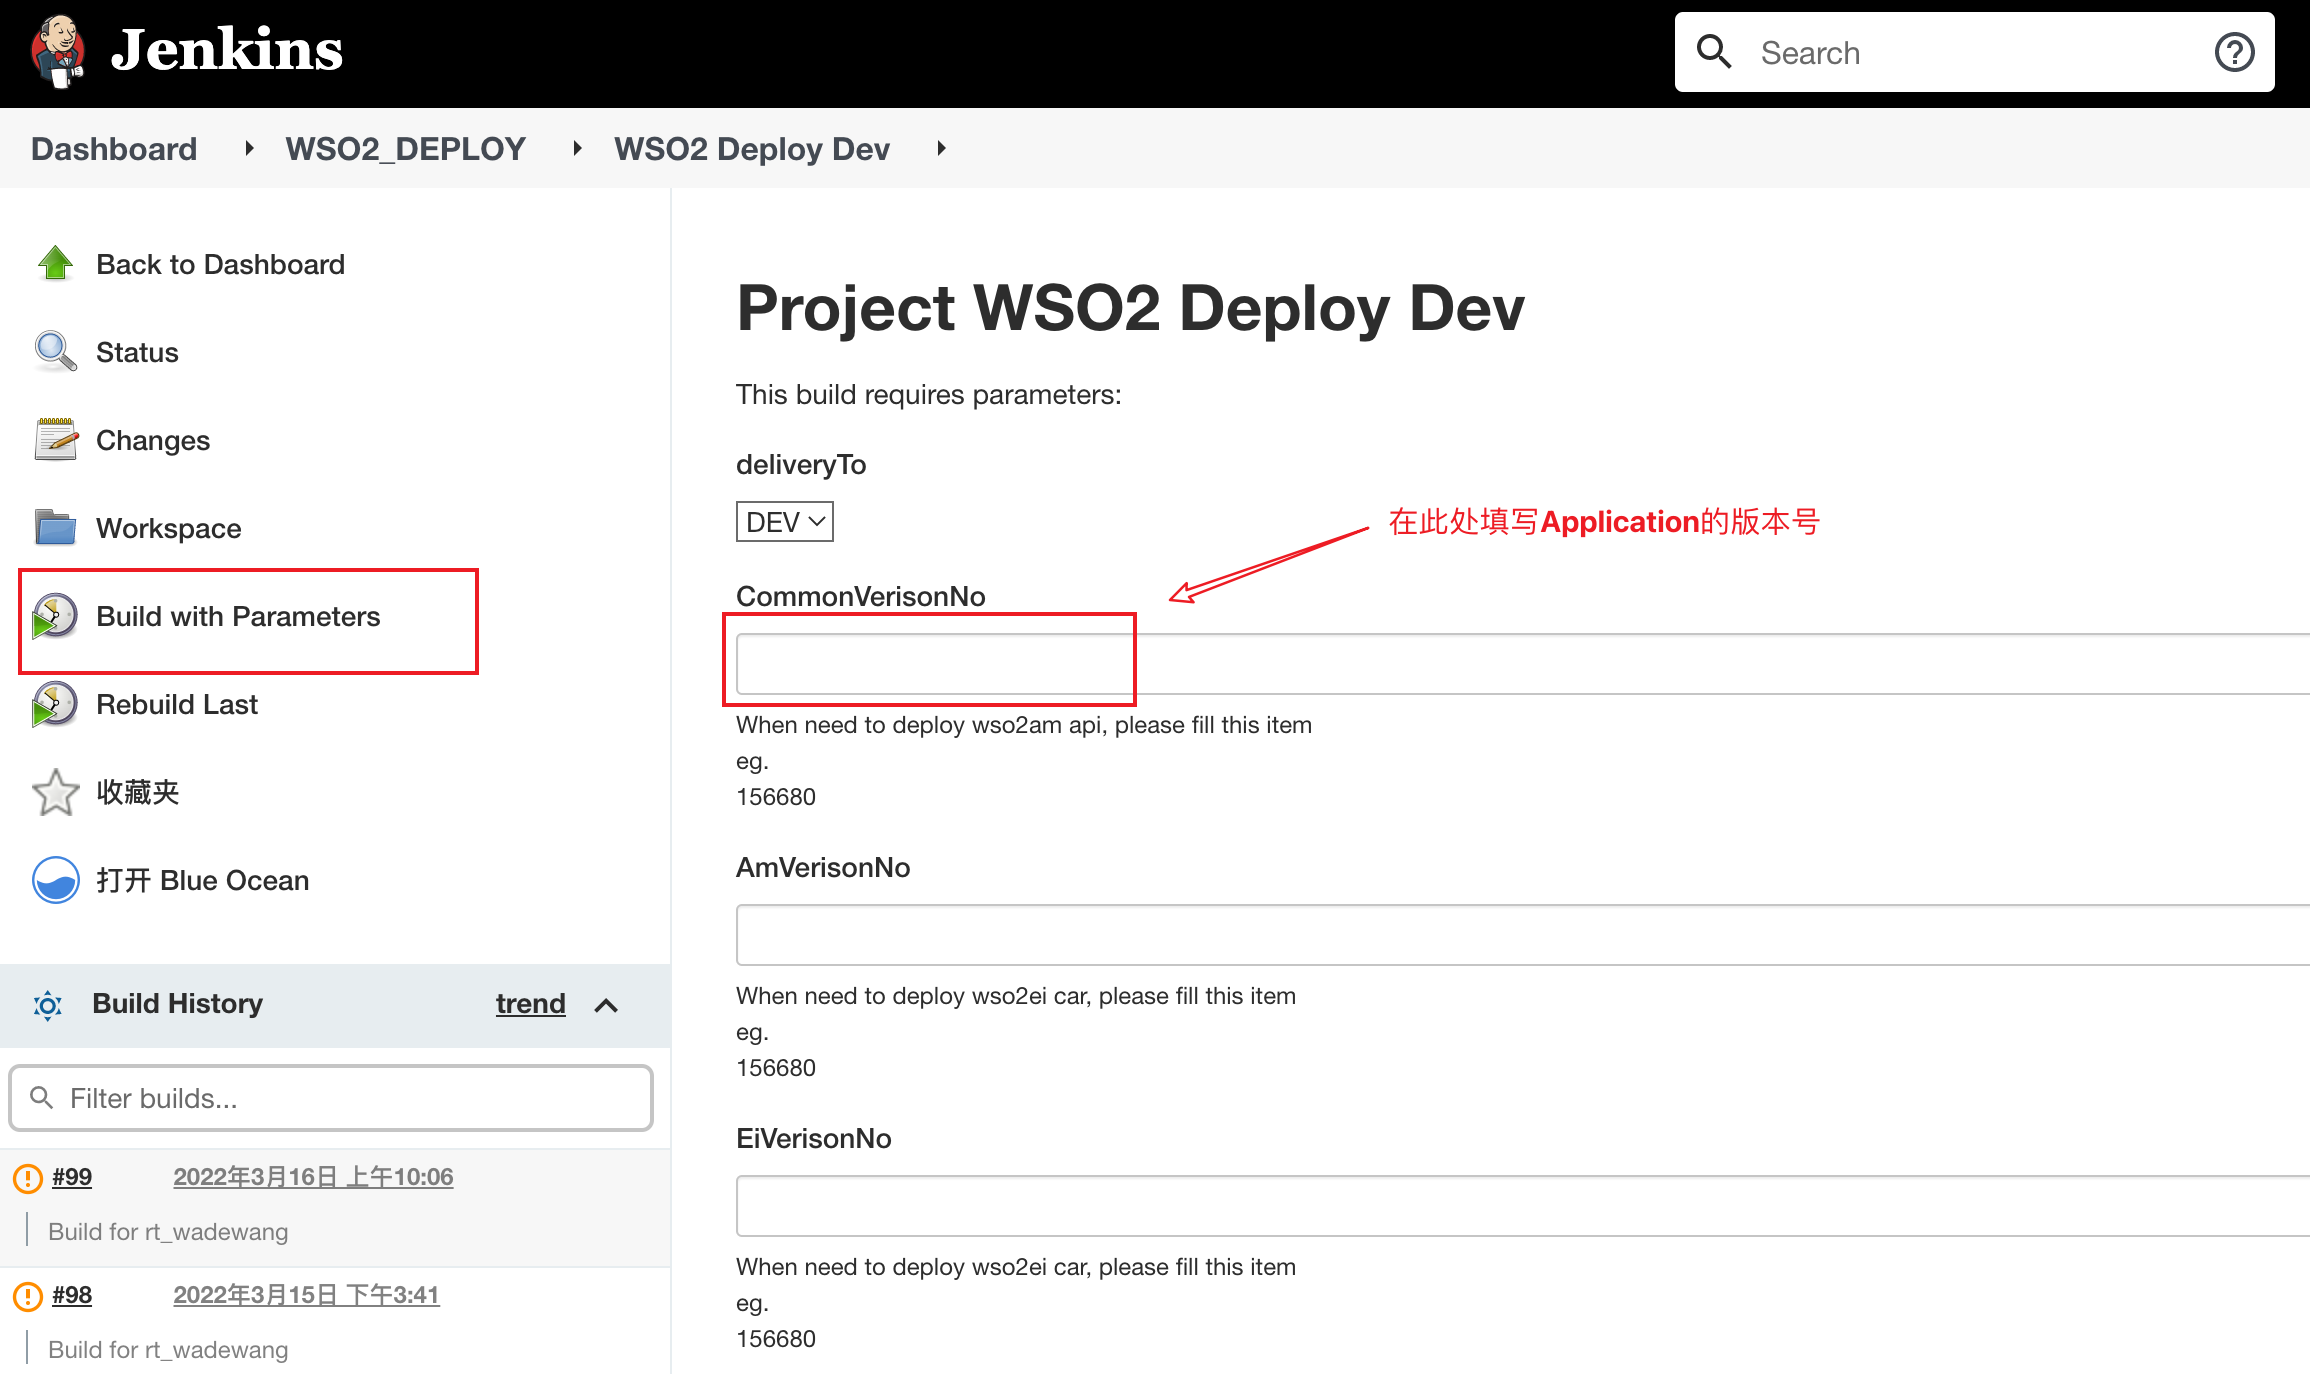
</applicationConfig>使用Jenkins部署App
需要运维开启对应帐号的部署权限
Dev环境: https://jenkins.tkeasia.com/view/WSO2_DEPLOY/job/WSO2%20Deploy%20Dev/
RC环境: https://jenkins.tkeasia.com/view/WSO2_DEPLOY/job/WSO2%20Deploy%20Staging/
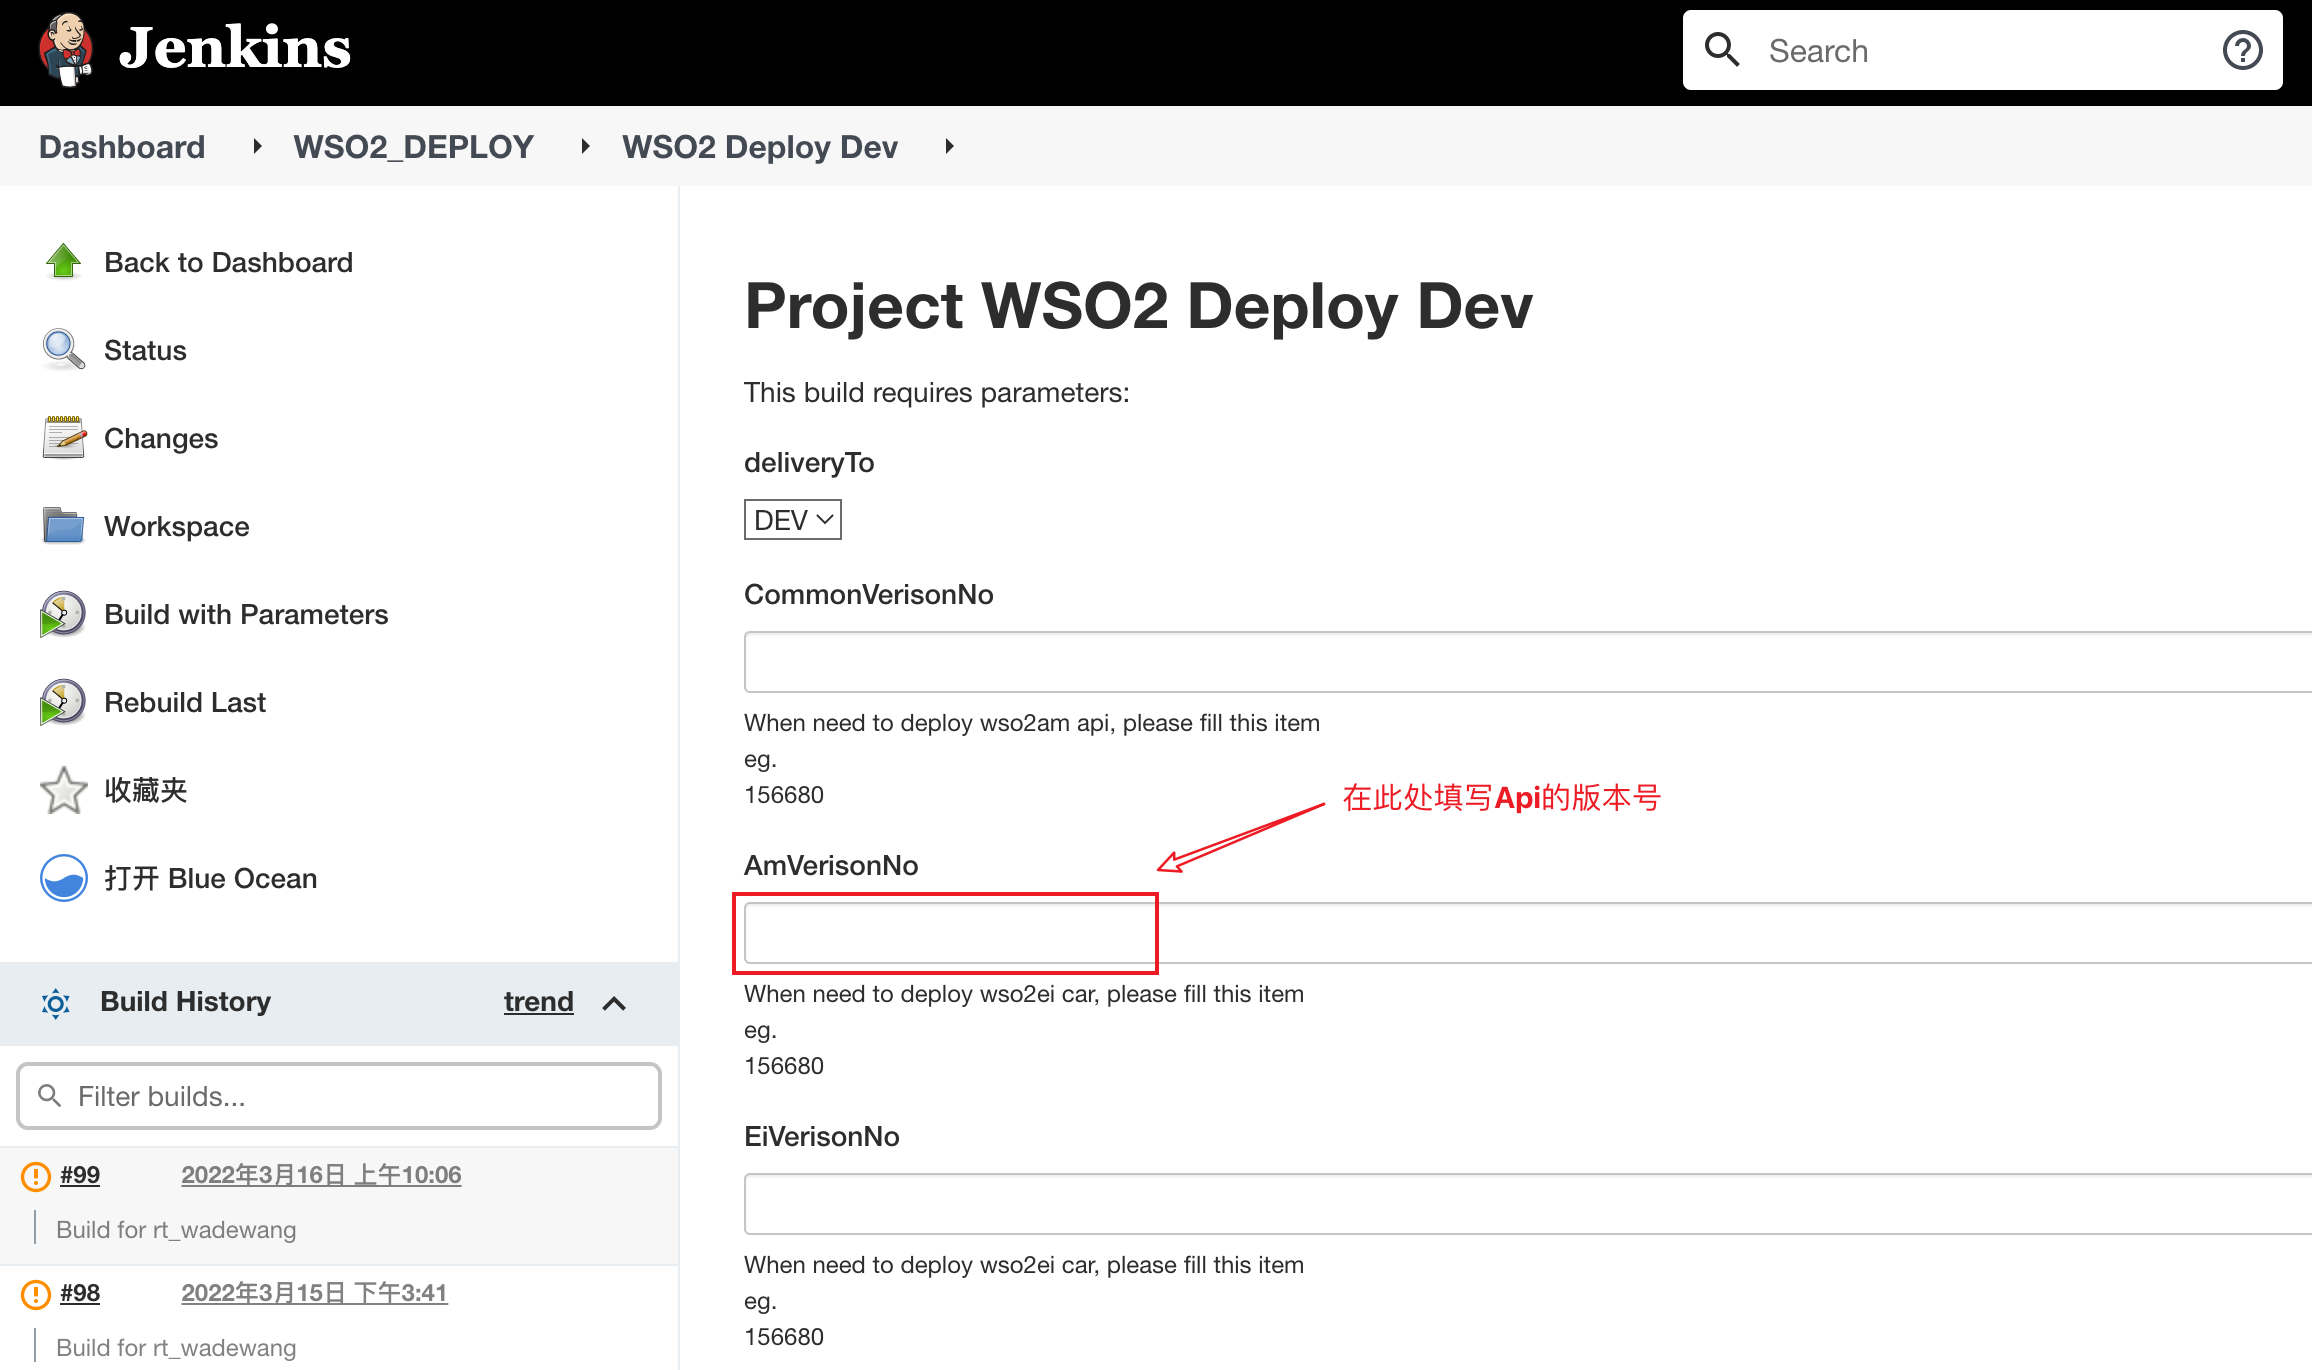
部署页面
部署成成功后,application的账号信息会发送到上面配置文件中的用户邮箱里。
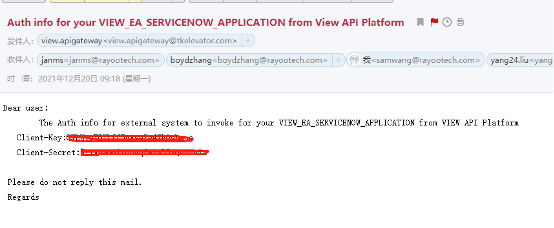
需要让运维在对应的环境中添加App的配置信息.restfulapi.authentication.ini文件 格式:
ini
[VIEW_AP_APPLICATION]
name="VIEW_AP_APPLICATION"
consumerKey="<Key>"
consumerSecret="<Secret>"
gatewayAuthUrl="https://apiapdev.fos.tkeasia.com"
gatewayRecourceUrl="https://apiapdev.fos.tkeasia.com"
2.创建并部署Api
在根目录创建如下两个文件
Demo/API_Managment/V1/apiConfig.xmlDemo/API_Managment/V1/swagger.json

apiConfig.xml 文件示例
xml
<?xml version="1.0" encoding="UTF-8"?>
<apiConfig>
    <!-- The name of the API (needed)     -->
    <name>Demo</name>
    <!-- Version of the API (needed)    -->
    <version>1.0</version>
    <!-- The request path of the API (needed)  -->
    <context>/suburi</context>
    <!-- The rateLimit info of the API -->
    <rateLimit>
        <!-- The speed limit of the API. Available setting: Unlimited/10000/20000/50000.Default is Unlimited -->
        <!-- <policies>Unlimited</policies> -->
        <!-- The TPS(Maximum back-end transactions per second in integers) of the API. default is Unlimited-->
        <!--<TPS>Unlimited</TPS>       -->
        <!-- The subscription policies of the API. Available setting: Unlimited/Gold(5000)/Silver(2000)/Brozen(1000).Default is Unlimited -->
        <!--                           -->
        <!--<subscriptionPolicies>Unlimited</subscriptionPolicies>-->
        <!-- If the endpoint is VIEW, if Y, will force set rate limit to 50.Available Value:Y/N.Default is Y -->
        <isViewEndPoint>Y</isViewEndPoint>
    </rateLimit>
    <!-- The endpoint info of the API-->
    <endpointInfo>
        <!-- The endpoint url info of the API,default is the EI path of the value set in context.  -->
        <!-- Or you can set as:{EI_URL}/Maintenancecntry  to connect to other path of the EI,or set the full path of other endpoint,like:<url>https://www.baidu.com/Maintenancecntry</url> -->
        <url>第三方接口地址</url>
        <!-- The endpoint Auth type,None:means no Auth, Basic:means use basic Auth, Oauth:means Oauth -->
        <authInfo>Basic</authInfo>
        <!-- The endpoint Auth info,if set "Basic" in authInfo will use as basic Auth username & password, "Oauth" will use as Oauth client-id&client-secret  -->
        <authName>demo.auth.basic.username</authName>
        <authPwd>demo.auth.basic.password</authPwd>
    </endpointInfo>
    <!-- The bind application of this API.One API could bind to multiple application.Value get from CommonAssets\ApplicationSetting,File name in each BU folder. If bind to multiple application,add this section.-->
    <!-- Rules:  -->
    <!-- VIEW->WSO2/WSO2->VIEW : 1:All API of each country under same bu share same application.                                                               -->
    <!-- ExternalSystem->WSO2 :  2:Different API of Same System under same country share same application.                                                     -->
    <applicationInfo>
        <bindApplication>VIEW_AP_APPLICATION</bindApplication>
        <!-- The application subscription policies of the API. Available setting: Unlimited/Gold(5000)/Silver(2000)/Brozen(1000).Default is Unlimited -->
        <!--<applicationPolicies>10</applicationPolicies>-->
    </applicationInfo>
    <!-- Decide which BU this API will apply to. Could apply to multiple BU,use "," as separator.Available value:AP/NA/EA/SA   -->
    <applyBU>AP</applyBU>
    <!-- The realted endpoint config file folder of this api,under path "CommonAssets\Enterprise_integrator\{BU}\EndPoint"     -->
    <!-- {BU} related to config value of line64 "applyBU",multiple use "," as separator -->
    <endPointConfig>Oz</endPointConfig>
</apiConfig>
swagger.json 文件示例
json
{
  "swagger": "2.0",
  "info": {
    "description": "The Api doc for the Demo,For outside system to post paitent info to FR.",
    "version": "1.0",
    "title": "Demo",
    "termsOfService": "http://swagger.io/terms/",
    "contact": {
      "email": "wadewang@rayootech.com"
    },
    "license": {
      "name": "Apache 2.0",
      "url": "http://www.apache.org/licenses/LICENSE-2.0.html"
    }
  },
  "host": "Demo",
  "basePath": "/ServiceNow",
  "tags": [
    {
      "name": "Hospital",
      "description": "Everything about the hospital info in this Demo",
      "externalDocs": {
        "description": "Find out more",
        "url": "http://swagger.io"
      }
    }
  ],
  "schemes": [
    "https"
  ],
  "paths": {
    "/*": {
      "post": {
        "tags": [
          "Hospital"
        ],
        "summary": "Send paitent info to us.",
        "description": "send the paient info to us,detail as below",
        "operationId": "sendPaitent",
        "produces": [
          "application/json"
        ],
        "parameters": [
          {
            "in": "body",
            "name": "body",
            "description": "Patient info to add",
            "required": true,
            "schema": {
              "$ref": "#/definitions/Patient"
            }
          }
        ],
        "responses": {
          "200": {
            "description": "successful operation",
            "schema": {
              "$ref": "#/definitions/ApiResponse"
            }
          },
          "400": {
            "description": "Hospital dose not match"
          },
          "500": {
            "description": "System Error"
          }
        },
        "security": [
          {
            "api_key": []
          }
        ]
      }
    }
  },
  "definitions": {
    "Patient": {
      "type": "object",
      "properties": {}
    },
    "ApiResponse": {
      "type": "object",
      "properties": {
        "code": {
          "type": "integer",
          "format": "int32"
        },
        "message": {
          "type": "string"
        }
      }
    }
  },
  "externalDocs": {
    "description": "Find out more about Swagger",
    "url": "http://swagger.io"
  },
  "securityDefinitions": {
    "ServiceNow": {
      "type": "oauth2",
      "authorizationUrl": "https://tkelevatordev01.service-now.com/api/now/table/sn_hr_core_obp_repair",
      "flow": "implicit",
      "scopes": {
        "add:Paitent": "send the patient info"
      }
    },
    "api_key": {
      "type": "apiKey",
      "name": "api_key",
      "in": "header"
    }
  }
}
在使用jenkins部署这两个文件之前,必须先让运维配置第三方API的帐号信息 (从Tke Leader处获取)
配置格式:demo.auth.basic.username <帐号> demo.auth.basic.password <密码>